Hiển thị các bài đăng có nhãn Blogger Widgets And Gadgets. Hiển thị tất cả bài đăng

Thứ Tư, 3 tháng 7, 2019

New Blogger Widget To Show Recently Updated Posts

New Blogger Widget To Show Recently Updated Posts

Are you a regular blog post updater? and you want to show your recently updated posts to your visitors but you can't because blogger doesn't have such widget. No problem 101Helper is here to help you and in this post I have a exclusively new widget which is not available on other blogs. Its a new widget which show all the posts you have just updated. In this post I will share its iframe code as well as source code so that you can use it for you desired purpose.

Before we move to steps and code of widget I would like to show you demo of this widget along with some info about it. So here is demo of Recently Updated Posts Blogger Widget.


You can see that this widget is showing all the recently updated posts along with date. This widget is best for blogs which have selling products or any blog with software so that visitors can see which software has a new version now.

Best place to show this widget on is Homepage of your blog but you can show it anywhere you want.

Now lets install it in your blog.


How To Install Recently Updated Posts Blogger Widget?


Step 1: Go to blogger and navigate to Layout.

add-gadget-blogger

Step 2: Click on add a gadget and a window will pop-up.

add-gadget-blogger-101helper

add-gadget-blogger-

Step 3: Select HTML/JAVASCRIPT and copy below code.
<iframe src="https://rawgit.com/fahimraza/myblog/master/updater.html?url=//101helper.blogspot.com/" style="border: 0; height: 440px; width: 100%;"></iframe>

Step 4: Paste it and substitute 101helper.blogspot.com with your blog's homepage url.

Step 5: Save your widget and visit your blog to see it live.


How To Install Recently Updated Posts Blogger Widget Inside Post?


If you want to put this widget inside your post like I did in this post, you can do it by putting the same code which is in step 3 above in your post's HTML editor.

Where else can you show this widget ? Well everywhere, its universal code you can even add it in wordpress or any webpage and it use same code for all blogger blogs but changes the data according to the link given.

In blogger this can be added in the blog theme code below every post or above post and anywhere in blog.

Source Code:

<!DOCTYPE html>
<html>
<head>
<meta charset="utf-8"/>
<title>Updated Posts</title>
<meta content='width=device-width, initial-scale=1' name='viewport'/>
<link href='https://fonts.googleapis.com/css?family=Roboto:300,400italic,400,500,500italic,700,700italic,900%7CMaterial+Icons' rel='stylesheet' type='text/css'/>
<style>
body {
  background-color:transparent;
  margin:0;
  padding:0;
  overflow:hidden;font-family:'Roboto'
}
 iframe{border:0;}
#updated-posts {
    color: #808080
}li.update a {
    color: #2196F3;
    text-decoration: none;
    font-weight: 300;font-family:'Roboto'; font-size: 13px;
}
li.update {
    height: 60px;
    overflow: hidden;
    list-style: none;
    border-bottom: 1px solid #e6e6e6;
    padding: 0;
    border-top: 1px solid #fdfdfd;
}
  .imgupdate { float:left; margin:5px 10px 0 5px }
  .tgl-com { display:block;font-size: 11px;
    padding-top: 5px;}
  ol#updated-posts {
    margin: 0;
    padding: 0;
}li.update a:hover {
    color: #00ab60;
}
.credit {
    Float: right;
    font-size: 70%;
    text-decoration: none;
    right: 10px;
    position: relative;
    top: 10px;
}
  </style>
<script>
function getQueryVariable(variable) {
var query = window.location.search.substring(1);
var vars = query.split("&");
for (var i=0;i<vars.length;i++) {
var pair = vars[i].split("=");
if(pair[0] == variable){return pair[1];}
}
return(false);
}
</script>
</head>
<body>
<ol id="updated-posts"></ol>
<script>
    //<![CDATA[
    var homePage = getQueryVariable("url"),
        numPosts = 5
        //]]>
</script>
  <script>
function updatedPosts(a) {
    if (document.getElementById("updated-posts")) {
        var e = a.feed.entry,
            title, img, link, date, content = "",
            ct = document.getElementById("updated-posts");
        for (var i = 0; i < 7; i++) {
            for (var j = 0; j < 7; j++) {
                if (e[i].link[j].rel == "alternate") {
                    link = e[i].link[j].href;
                    break
                }
            }
            var title = e[i].title.$t,
                pd = e[i].published.$t.substring(0, 10),
                date = pd.replace(/-/g, "/");
            if ("media$thumbnail" in e[i]) {
                img = e[i].media$thumbnail.url
            } else {
                img = "https://blogger.googleusercontent.com/img/b/R29vZ2xl/AVvXsEi2s3sl8BUam3wPSd1jIAPZ18-4c-jW-yskmVgGY2TpugBloKtSZt4J8uVxYm1g9YIy3pWqIoQGdlTtHMFgFJeWd9W2mUxspy0FF4uKHHszQiZcZw1RBhJyMBdJ6A4fkGPIqcdItFDlt_k/s40/images+%25281%2529.jpg"
            }
            content += '<li class="update"><img src="' + img.replace(/\/s72-c/, "/s40-c") + '" class="imgupdate" alt="thumb" height="40px" width="40px"/>';
            content += '<strong><a href="' + link + '" target="_blank">' + title + '</a></strong><span class="tgl-com"> Updated on: ' + date + "</span></li>";
        }
        ct.innerHTML = content
    }
}
var you_script = document.createElement('script');
you_script.src = homePage + '/feeds/posts/summary?alt=json-in-script&orderby=updated&max-results=7&callback=updatedPosts';
document.getElementsByTagName('head')[0].appendChild(you_script);

 </script>
<div class="credit"><a href="https://101helper.blogspot.com/2019/06/updated-posts-widget-for-blogger-101helper.html">Get this widget.</a></div>
</body>
</html>
I hope you found this post helpful. If not leave your feedback in comments. Thanks for visiting.

Thứ Năm, 9 tháng 5, 2019

Random Post Iframe Widget For Blogger

After a long time I am back with a new random posts widget for you. This is a simple random post widget but there are some new features. This widget has a simple coding and you have a small code for it unlike the old random post widget which had a long code and slowed your blog loading.

The source code of this widget is hosted on github. Github is a fast hosting so I chose it, although you can store it on any free or your paid hosting. The benefit of hosting source code and running this widget is you get rid of long codes and the other benefit is you can put this random post widget in the form of an iframe anywhere in the blog. You can just put the small iframe in between the posts, in sidebar in footbar and anywhere in the blog.

So this widget will not only speed up your blog but also you can engage your visitors for a blog time because in between the posts your visitor will be seeing older posts which if got his interest you will double up your blog traffic.

Whenever i create a post about widgets i am always focused on traffic, site speed and look of the blog because all these matters alot.

So here in this post I will share iframe code of this innovative widget and also source code for those who want to have their own stored widget or they may want to modify the code.

In my opinion there is no need of modifications as it is already best.

Iframe Code of Random post widget


Customizations:

You can change height and width of the widget and replace the url with your blog as highlighted in the above code.

Live Demo

Scroll down to the bottom of the post to see live demo of this widget.

Source Code:

<!DOCTYPE html>
<html>
<head>
<meta charset="utf-8">
<title>Random Posts</title>
<meta content='width=device-width, initial-scale=1' name='viewport'>
<link href='https://fonts.googleapis.com/css?family=Roboto:100,200,300,400italic,400,500,500italic,700,700italic,900%7CMaterial+Icons' rel='stylesheet' type='text/css'/>
<style>
body {
background-color:white;
margin:0;
padding:0;
color:#212121;
}
a {
color:#212121;
text-decoration:none;
}
a:hover {color:#0379C4}

/* ==== Related Post Widget Start ==== */

.related-post {
margin:1em auto 0;
font-family: Roboto, sans-serif;
font-size:16px;
}
.related-post h4 {
font-size: 20px;
margin: 0px 0px 15px 5px;
font-weight: 500;
}
/* Style 2 */
.related-post-style-2 li:last-child {
border: 0;
}
.related-post-style-2 li {
display: block;
color: #111;
height: 75px;
padding: 10px 0px 10px;
float: none;
overflow: hidden;
margin: 0 5px 10px;
border-radius: 2px;
list-style: none;
border-bottom: 1px solid #eee;
}
.related-post-style-2 li:hover {
background: none;
}
.related-post-style-2 {
margin:0;
padding:0;
list-style:none;
max-height:292px;
}
.related-post-style-2 .related-post-item-thumbnail {
width:110px;
height:83px;
max-width:none;
max-height:none;
background-color:transparent;
border:none;
padding:0;
float:left;
margin:-8px 10px 0 0;
}
.related-post-style-2 .related-post-item-title {
font-weight:500;
font-size:17px;
}
.related-post-style-2 .related-post-item-summary {
overflow:hidden;
margin-top:5px;
color:#333;
font-size:14px;
text-overflow: ellipsis;
display: block;
display: -webkit-box;
-webkit-line-clamp: 2;
-webkit-box-orient: vertical;
}
.related-post-style-2 .related-post-item-more {
display:none;
}
@media screen and (max-width:320px){.related-post-style-2 .related-post-item-summary {display:none;}
}
a#credits {
float: right;
color: #FF5722;
margin-right: 20px;
}
/* ==== Related Post Widget End ==== */
</style>
</head>
<body>
<a target='_blank' id='credits' href='https://101helper.blogspot.com/2019/05/random-post-iframe-widget-for-blogger.html'>Get widget</a>
<div id="related-post" class="related-post">
</div>
<script>
function getQueryVariable(variable) {
var query = window.location.search.substring(1);
var vars = query.split("&");
for (var i=0;i<vars.length;i++) {
var pair = vars[i].split("=");
if(pair[0] == variable){return pair[1];}
}
return(false);
}
var labelArray = [],
relatedPostConfig = {
homePage: getQueryVariable("url"),
numPosts: 3,
summaryLength: 100,
widgetStyle: 2,
callBack: function() {
var $container = $('#' + this.containerId + ' > ul'),
$list = $container.find('li'),
innerHeight = $list.first().height(),
outerHeight = $list.first().outerHeight(true);
// Container & list height setup
$container.css({
"height": outerHeight * $list.length / 2,
"overflow": "hidden"
});
$list.css({
"height": innerHeight,
"overflow": "hidden"
});
}
};
</script>
<script>
var randomRelatedIndex,showRelatedPost;(function(n,m,k){var d={widgetTitle:"<h4>You may also like...</h4>",widgetStyle:1,homePage:"https://101helper.blogspot.com/",numPosts:7,summaryLength:370,titleLength:"auto",thumbnailSize:200,noImage:"data:image/png;base64,iVBORw0KGgoAAAANSUhEUgAAAAEAAAABCAIAAACQd1PeAAAAA3NCSVQICAjb4U/gAAAADElEQVQImWOor68HAAL+AX7vOF2TAAAAAElFTkSuQmCC",containerId:"related-post",newTabLink:false,moreText:"READ MORE",callBack:function(){}};for(var f in relatedPostConfig){d[f]=(relatedPostConfig[f]=="undefined")?d[f]:relatedPostConfig[f]}var j=function(a){var b=m.createElement("script");b.type="text/javascript";b.src=a;k.appendChild(b)},o=function(b,a){return Math.floor(Math.random()*(a-b+1))+b},l=function(a){var p=a.length,c,b;if(p===0){return false}while(--p){c=Math.floor(Math.random()*(p+1));b=a[p];a[p]=a[c];a[c]=b}return a},e=(typeof labelArray=="object"&&labelArray.length>0)?"/-/"+l(labelArray)[0]:"",h=function(b){var c=b.feed.openSearch$totalResults.$t-d.numPosts,a=o(1,(c>0?c:1));j(d.homePage.replace(/\/$/,"")+"/feeds/posts/summary"+e+"?alt=json-in-script&orderby=updated&start-index="+a+"&max-results="+d.numPosts+"&callback=showRelatedPost")},g=function(z){var s=document.getElementById(d.containerId),x=l(z.feed.entry),A=d.widgetStyle,c=d.widgetTitle+'<ul class="related-post-style-'+A+'">',b=d.newTabLink?' target="_parent"':"",y='<span style="display:block;clear:both;"></span>',v,t,w,r,u;if(!s){return}for(var q=0;q<d.numPosts;q++){if(q==x.length){break}t=x[q].title.$t;w=(d.titleLength!=="auto"&&d.titleLength<t.length)?t.substring(0,d.titleLength)+"&hellip;":t;r=("media$thumbnail"in x[q]&&d.thumbnailSize!==false)?x[q].media$thumbnail.url.replace(/\/s[0-9]+(\-c)?/, "/s"+d.thumbnailSize):d.noImage;u=("summary"in x[q]&&d.summaryLength>0)?x[q].summary.$t.replace(/<br ?\/?>/g," ").replace(/<.*?>/g,"").replace(/[<>]/g,"").substring(0,d.summaryLength)+"&hellip;":"";for(var p=0,a=x[q].link.length;p<a;p++){v=(x[q].link[p].rel=="alternate")?x[q].link[p].href:"#"}if(A==2){c+='<li><a href="'+v+'" title="'+t+'"'+b+' target="_parent"><img alt="" class="related-post-item-thumbnail" src="'+r+'" width="'+d.thumbnailSize+'" height="'+d.thumbnailSize+'"></a><a class="related-post-item-title" title="'+t+'" href="'+v+'"'+b+" target='_parent'>"+w+'</a><span class="related-post-item-summary"><span class="related-post-item-summary-text">'+u+'</span> <a href="'+v+'" class="related-post-item-more"'+b+">"+d.moreText+"</a></span>"+y+"</li>"}else{if(A==3||A==4){c+='<li class="related-post-item" tabindex="0"><a class="related-post-item-title" href="'+v+'"'+b+' target="_parent"><img alt="" class="related-post-item-thumbnail" src="'+r+'" width="'+d.thumbnailSize+'" height="'+d.thumbnailSize+'"></a><div class="related-post-item-tooltip"><a class="related-post-item-title" title="'+t+'" href="'+v+'"'+b+" target='_parent'>"+w+"</a></div>"+y+"</li>"}else{if(A==5){c+='<li class="related-post-item" tabindex="0"><a class="related-post-item-wrapper" href="'+v+'" title="'+t+'"'+b+' target="_parent"><img alt="" class="related-post-item-thumbnail" src="'+r+'" width="'+d.thumbnailSize+'" height="'+d.thumbnailSize+'"><span class="related-post-item-tooltip">'+w+"</span></a>"+y+"</li>"}else{if(A==6){c+='<li><a class="related-post-item-title" title="'+t+'" href="'+v+'"'+b+" target='_parent'>"+w+'</a><div class="related-post-item-tooltip"><img alt="" class="related-post-item-thumbnail" src="'+r+'" width="'+d.thumbnailSize+'" height="'+d.thumbnailSize+'"><span class="related-post-item-summary"><span class="related-post-item-summary-text">'+u+"</span></span>"+y+"</div></li>"}else{c+='<li><a title="'+t+'" href="'+v+'"'+b+" target='_parent'>"+w+"</a></li>"}}}}}s.innerHTML=c+="</ul>"+y;d.callBack()};randomRelatedIndex=h;showRelatedPost=g;j(d.homePage.replace(/\/$/,"")+"/feeds/posts/summary"+e+"?alt=json-in-script&orderby=updated&max-results=0&callback=randomRelatedIndex")})(window,document,document.getElementsByTagName("head")[0]);
</script>
</body>
</html>

How to add iframe code in blogger posts and sidebar?

Step 1: Go to blogger and navigate to layout.

Step 2: Click on add a gadget, choose HTML/JavaScript and put the iframe code.


Random Post Iframe Widget For Blogger layout


Step 3: Save the widget.

To put random posts widget in posts follow below steps:

Step 1: Go to blogger and click on posts.


Random Post Iframe Widget For Blogger 101helper


Step 2: Click on Edit post.


Random Post Iframe Widget For Blogger 101helper Blog


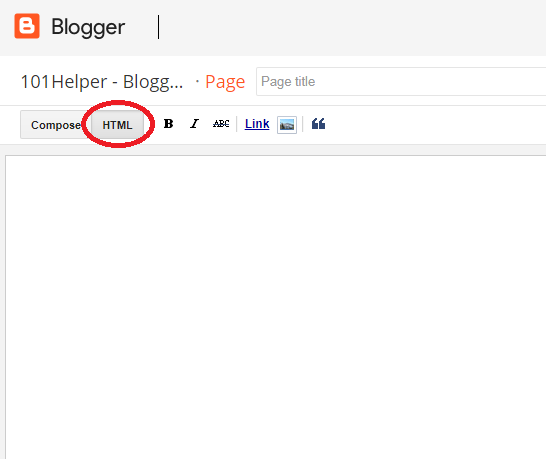
Step 3: Switch to HTML mode of post editor as shown in below picture.


Random Post Iframe Widget For Blogger


Step 4: Copy iframe code from above and past it in the HTML code of your post.


Random Post Iframe Widget For Blogger 101helper 1


Step 5: Save and publish your post.

If you want to have better look, you may use CSS. I suggest you to put the random posts wiget 2-3 times in long posts and 1 time in short post.

Try putting the iframe after completing your post otherwise you may put random post widget in wrong place because in HTML its not easy to find the exact location. Try to use CTRL+F to find the sentences in the HTML Editor and then put the code below or above.

Don't break any </div> at the time of putting the iframe, it will result in disappearance of whole post or the content may be irregular.

Use <br/> for space above and below iframe.

If you have any questions you can ask me. I hope you liked the post, try to share it please.

Thanks for visiting 101Helper.

Thứ Bảy, 9 tháng 6, 2018

Pop-up Popular Posts Widget For Blogger Mobile

trending-popular-posts-widget-for-blogger-mobile-site

Welcome again bloggers, today I am back with a new widget for blogger mobile site. I am doing this post on request of many bloggers who sent me messages about my trending post widget in mobile site. If you haven't seen it yet, visit 101Helper on mobile to see it live. Its a simple popular posts widget that is for desktop site with some Javascript and CSS modifications. So I have simply provided this widget with a tinny red trend button and also modified the images of widget so it has big thumbnails and you can scroll down for more posts. You can also add upto 10 posts which are updated automatically and you have to just set the values in Layout just like a simple popular posts widget but the updates can be seen only in mobile site.


Steps to install Pop up Trending Posts Widget in Blogger Mobile Site:


Step 1: Go to blogger and navigate to theme.

Step 2: Click on Edit HTML.

Step 3: Click on Jump to widget and select Blog1.

how-to-add-popular-post-widget-in-blogger-mobile-site

Step 4: Copy below code.

<b:widget id='PopularPosts2' locked='false' mobile='only' title='On Trend' type='PopularPosts' version='1'>
                              <b:widget-settings>
                                <b:widget-setting name='numItemsToShow'>5</b:widget-setting>
                                <b:widget-setting name='showThumbnails'>true</b:widget-setting>
                                <b:widget-setting name='showSnippets'>false</b:widget-setting>
                                <b:widget-setting name='timeRange'>LAST_WEEK</b:widget-setting>
                              </b:widget-settings>
                              <b:includable id='main'>
<div class='trend-shadow'/>
  <div class='trend-mobile'>
<a class='x-trend' href='javascript:' rel='nofollow'>&#10006;</a>
<script>
$(document).ready(function(){
  $(&quot;.o-trend&quot;).click(function() {
 $(&#39;body&#39;).addClass(&#39;noscroll&#39;);
    $(&quot;#PopularPosts2&quot;).fadeIn(&quot;fast&quot;);
  });

  $(&quot;.x-trend&quot;).click(function() {
 $(&#39;body&#39;).removeClass(&#39;noscroll&#39;);
    $(&quot;#PopularPosts2&quot;).fadeOut(&quot;fast&quot;);
  });
});
</script>
<style>
#PopularPosts2 {
    text-align: center;
    margin: 0 auto;
    width: 300px;
display:none
}
body.loading.mobile.noscroll {
overflow:hidden
  }
.o-trend {
    position: fixed;
    right: 60px;
    top: 10px;
    box-shadow: 0px 2px 5px #444;
    border-radius: 100px;
    z-index: 999;
    cursor: pointer;
}
a.x-trend {
    position: fixed;
    font-size: 30px;
    color: #ef5858;
    z-index: 999;
    background: rgba(255, 255, 255, .7);
    box-shadow: 0px 2px 5px #bbb;
    border-radius: 70px;
    right: -10px;
    top: -15px;
    padding-top: 15px;
    padding-right: 25px;
    padding-bottom: 5px;
    padding-left: 13px;
}
.trend-mobile {
    position: fixed;
    height: 100%;
    z-index: 9999999999;
    overflow-x: hidden;
    top: 10px;
}
.trend-shadow {
    position: fixed;
    left: 0;
    top: 0;
    height: 100%;
    width: 100%;
    z-index: 9999999999;
    background: #fff;
}
.trend-mobile ul {
    padding: 0;
    margin: 0;
}
.trend-mobile ul li {
    list-style: none;
    margin-bottom: 20px;
    margin-right: 0;
    margin-left: 0;
    margin-top: 0;
    width: 300px;
    padding: 0;
}
.trend-mobile .item-thumbnail {
    float: none;
    margin: 0;
}
.trend-mobile img {
    margin-right: 0;
    background: #ffffff;
    border: 1px solid #ddd;
    padding: 0;
    width: 300px;
    height: 160px;
}
.trend-mobile .item-title {
    text-align: left;
    float: left;
}
.trend-mobile li a {
    color: #444;
    font-weight: bold;
    font-size: 16px;
    font-family: arial,sans-serif;
}
.trend-mobile a:hover {
    color: #222;
    text-decoration: none;
}
</style>
    <ul>
      <b:loop values='data:posts' var='post'>
      <li>
        <b:if cond='!data:showThumbnails'>
          <b:if cond='!data:showSnippets'>
            <!-- (1) No snippet/thumbnail -->
            <a expr:href='data:post.href'><data:post.title/></a>
          <b:else/>
            <!-- (2) Show only snippets -->
            <div class='item-title'><a expr:href='data:post.href'><data:post.title/></a></div>
            <div class='item-snippet'><data:post.snippet/></div>
          </b:if>
        <b:else/>
          <!-- (3) Show only thumbnails or (4) Snippets and thumbnails. -->
          <div expr:class='data:showSnippets ? &quot;item-content&quot; : &quot;item-thumbnail-only&quot;'>
            <b:if cond='data:post.featuredImage.isResizable or data:post.thumbnail'>
              <div class='item-thumbnail'>
                <a expr:href='data:post.href'>
                  <b:with value='data:post.featuredImage.isResizable? resizeImage(data:post.featuredImage, 300)                                  : data:post.thumbnail' var='image'>
                    <img alt='' border='0' expr:src='data:image'/>
                  </b:with>
                </a>
              </div>
            </b:if>
            <div class='item-title'><a expr:href='data:post.href'><data:post.title/></a></div>
          </div>
          <div style='clear: both;'/>
        </b:if>
      </li>
      </b:loop>
    </ul>
    <a href='https://101helper.blogspot.com/2018/06/pop-up-popular-posts-widget-for-blogger.html'>Get widget</a>
  </div>
</b:includable>
                            </b:widget>

Step 5: Paste it just above this line <b:widget id='Blog1' locked='false' OR <b:widget id='Blog1' locked='true'


how-to-add-popular-posts-widget-in-blogger

Keep in mind that your code should look similar to shown in the image above. In the above image the code in not in expanded form so If you find your code expanded then don't worry its fine unless you find any error while saving code in Step 6.

Step 6: Click Save theme button and use CTRL+F on your keyboard to open search box and search for </body>.

Step 7: Copy below piece of code and paste it just above </body> as shown in below image.


<b:if cond='data:blog.isMobile'>
<b:if cond='data:blog.pageType != &quot;static_page&quot;'>
<img class='o-trend' src='https://blogger.googleusercontent.com/img/b/R29vZ2xl/AVvXsEjb6KKzGRP4-KcdSqJTFPlJae-D2MtRZ3zvVhR8-F6U2bSSwz__FCyQUW0Pmtt3l39L20MwP-xOJvv9FGxjw8qsnVPzcXJDUJ9Jnu-SnD37VbdWMgxnOVHM_YLcLyWo4xrQ5UKCPYtk-e0/s1600/trending.png'/>
</b:if>
</b:if>

Step 8: Now again hit CTRL+F on keyboard and search for </head>.

Step 9: Copy below script and paste it just above </head>.
<script defer='defer' src='https://ajax.googleapis.com/ajax/libs/jquery/2.0.2/jquery.min.js'/>

Final Step: Click on Save theme button and you are done.

Trending posts widget not working, What to do?

Visit your mobile site to see if widget is working properly in your blog. If you don't see your trending post widget then go to your blog theme section again and look for mobile template, there click on settings icon below mobile site theme and enable Custom theme. Now go to your mobile site again to check if it is working or no. If you have any problem you can leave a comment below or contact us. You will be helped shortly!

how-to-enable-custom-theme-for-blogger-mobile-site
Image showing Settings button for mobile site theme.  

custom-mobile-site-theme-blogger
Image showing how to enable custom theme for blogger mobile site.

I hope you found this post helpful, if not or if you have any suggestion please leave a comment below. Thanks for visiting 101Helper. Like us on Facebook or follow on Google+ to stay updated about new posts.

Search keywords: Pop up Trending Posts Widget For Blogger Mobile Site,trend posts widget with button,popular posts widget with big thumbnails for blogger,popular post popup widget for blogspot,101helper widgets for blogger,popular posts big images widget for blogger

Thứ Năm, 12 tháng 4, 2018

Grid View Sitemap For Blogger With Thumbnails / Images

grid-view-template-for-blogger-with-thumbnails-image

Sitemap is a good way to showcase all your posts and help visitors find every post in one place. By far I have shared two types of sitemaps, first is simple list of all posts with label names and other with grid view but names of posts only, so in this post I will teach you how to create a grid view sitemap with thumbnails. It is simple sitemap with all published posts and when a picture is hovered with mouse cursor it flips and show the name of respective post with its publish date and number of comments if any ! So its a impressive sitemap and you show try it once.

Here is a demo of the grid view sitemap with thumbnails/images for blogger blog.

Steps To Add Grid View Sitemap For Blogger With Thumbnails

Step 1: Go to Blogger > Pages and click on New Page.

grid-view-template-for-blogger-with-thumbnails-images

Step 2: Switch to HTML view.


Step 3: Copy below code and replace https://101helper.blogspot.com with your blog link

<style type="text/css">
.grid-sitemap {
 overflow: hidden;
 position: relative;
 height: 565px;
 margin: 20px 0 40px 0;
}
.grid-sitemap iframe {
    display: block;
    width: 100%;
    height: 680px;
    margin-top: -115px;
    margin-left: -5px;
}
</style>
<div class="grid-sitemap">
 <iframe src="https://101helper.blogspot.com/view/flipcard"></iframe>
</div>


Step 4: Give a title to your page and Publish it and its done

Similar Posts:

● How To Add A Html Sitemap Page In Blogger

● How To Add Advanced Sitemap In Blogger

I hope you like this post, if not and you have a good opinion, tell me in comments. Thanks for visiting 101helper. Don't forget to share.

Search Keywords: Grid View Sitemap For Blogger With Thumbnails / Images,Simple sitemap for blogger,how to add sitemap code in blogger pages,how to create a sitemap page in blogger,gadgets and widgets for blogger 101helper

Chủ Nhật, 18 tháng 3, 2018

How To Get +1000 Email Subscribers In 30 Days

grow-your-email-list

Sounds good? Yes! now you can easily without any hard work, make a super huge email list with this simple trick. All you need is a blog, some visitors not too many but at least 150 a day, more will be good and sumo website tools. So if you don't have a sumo account then go and read this post and come back to this post to build a super huge email list in no time.

If you don't know why I want a huge email list then let me tell you that if a visitor visits your blog and you have his email, you can send him all your new posts and get him back to your blog so its like binding him with your site so you don't loose your old traffic and the new visitors also visit your blog. So its like multiplying traffic by keeping old visitors engaged and getting new visitors. And the new visitors then become your email list subscriber and old visitor is already in list, so it go in this way and in the end you have a big audience for your blog.

How to build huge email list with Sumo Welcome Mat:

Step 1: Go to sumo tools and login to your account, if you don't have one, make it by following this post.

Step 2:  Add New Site  if you are new to Sumo tools or  Manage  your excising site.

use-sumo-tools-to-build-email-list

Step 3: Click on Forms in the menu on left side and choose List builder.

use-sumo-welcome-mat-to-build-email-list

Step 4: Click on Create New Form.

welcome-mat-sumo-tools-list-builder

Step 5:

» Set My Goal as Collect Emails.

email-list-building-tools

» Select Welcome Mat as email collector(Form type).

collect-emails-for-email-list

» Choose design from list.

email-subscribe-widget-blogger

» Choose visibility Mode:

smart-mode-sumo-tools

Smart Mode: In this mode sumo decides when your welcome mat should show. It chooses best time for your welcome mat and its really smart specially when you have multiple welcome mats it chooses best time and best visitor to show it to him.

Manual Mode: In this mode you decide when will welcome mat show. If you want to show your welcome mat always to every visitor then leave the default settings but if you want to show welcome mat to a visitor only once in an hour, minutes, days, months or even year then switch always show to desired option and enter the time in which you want welcome mat to show, as shown in below image:

sumo-website-tools-blogger-welcome-mat-tool

Switch on Toggle on to stop visitors from scrolling page when the welcome mat is shown.

You can also change display mode to Embedded or Parallax. In Embedded mode you have to place below piece of code where you want the welcome mat to slide down and show up.

<span class="sumome-welcomemat-anchor"></span>

In Parallax mode the welcome mat shows up as a parallax. To know what is parallax, set it and see it live.

So in this way you have control over your welcome mat, there are some advanced settings too by which you decide on which pages your welcome mat is going to show.

Step 6: Now you have Success option, leave it.

Step 7: Now connect your welcome mat to a Email service, so when it collects emails for you then send it to your Email service which you use to send emails to visitors.There are many good email services, choose one which you use and connect it to your welcome mat.

Step 8: Click on Publish button and its done!

connect-email-service-sumo-tools

If you are using feedburner then don't connect to any email service, all collected emails will be saved in your sumo account in subscribers section. You can copy each email and send it your latest post and add it to your feedburner list manually but your visitor will receive emails only when he approves your feedburner to send emails to him.

I personally use Mailchimp to send emails to my blog subscribers and it is a very good email service because its easy to use and provides me full data about every subscriber, whether he opens my emails, visit links or no. So I know which subscriber is active.

What else can you do with sumo to collect emails?

Sumo provides you great tools for free and you have multiple options to collect emails. E.g Popups, slide outs, Welcome mats, Sumo scrolling bar, Inline form and Cart casino(Pro users only). All you need to do is to select Goal as collect emails and choose the form type and follow instructions as show above.

I hope its a good post for you and you got help. If not please leave a comment below.

Don't forget to share this post, it motivates me to create more good posts for you.

Thanks for visiting 101Helper.

Search Keywords:create a huge email list,how to get subscribers for emails,email subscribers widget blogger,how to collect emails,best tools to collect emails,increase email subscribers fast,Grow email list,How To Get +1000 Email Subscribers In 30 Days With Welcome Mat

Thứ Sáu, 27 tháng 10, 2017

How To Use Sumo Tools In Blogger To Boost Traffic,Mail List And Followers

I am frequently posting about plugins that are useful to boost traffic, grow email list, get followers and more, So far I have posted about Hellobar plugin, Getsitecontrol plugin, Addthis plugins and also about shareaholic, engageya recommendation widgets. All these external plugins are really useful to increase pageviews and some of them also helps you to increase followers like Hellobar and Getsitecontrol.

In this post I am going to tell you about Sumo tools, the reason for posting about this plugin is I am impressed by their new ideas like legendary email collector(slides down from the top and covers the whole page and ask for email, with a "no thanks and arrow" button which slides it up in case if user do not want to subscribe.

It also have other innovative tools like "highlighter" which shows tweet and facebook share button when a text is highlighted by a visitor so it increases your social shares upto 300%. Other tools include a wide range of share buttons layout and a full control over it. You can show share buttons anywhere on your page just by selecting the desired layout.

Let me discuss the features of Sumo tools one by one below so if anyone wants to skip the into he can read the features below before using sumo tools.

Features Of Sumo Tools:

1. Free & Pro:

Sumo tools are free to use but you can upgrade for more features like more websites, limitless features, suggestions to improve site, boost traffic and organic ways to get free traffic from search engines. So if you want you can use free sumo tools and if you want you can upgrade anytime to pro account for more features.

2. Innovative Tools:

Sumo tools are innovative and different from other tools. Some of them are legendary email collector which slides down from top of the page, take over the whole page and asks for email and it is the best tool to grow email list, I have used this tool and received +50 emails in a week and you can get more with this. This tool works better than popup email collector. Other innovative tools are highlighter tools which shows Facebook and twitter share buttons when a word or sentence is selected on your site so it can increase your social shares. Other innovative tools include heatmaps which records your visitors clicks so you know where they click and you can show ads or interactive content there. More tools include Pinterest, Facebook, Twitter popups so you can get more likes or followers.

3. Easy to install:

Sumo tools are easy to use and install, although it is not a unique feature but it is a feature.

4. No render blocking scripts:

Sumo tools doesn't have any render blocking script so it does not slow down your site.

There are more tools and features which you can read at Sumo.

You may also like similar tools:

1. How To Install "GetSiteControl" Widgets In Blogger ?

2. How To Use Hellobar Tools In Blogger ?

3. How To Use Addthis Tools In Blogger To Improve Traffic And Shares ?

How To Install & Use Sumo Tools In Blogger ?

Step 1: Go to Sumo.

Step 2: Enter your Site / Blog url and click on Get it free.

Note: If the site design is changed you may need to follow the instructions from Sumo so skip signup process.

Step 3: Enter you email address and password and click on Signup.

how-to-use-sumo-tools-in-blogger-101helper

Step 4: Copy the Javascript code and go to Blogger > theme and click on Edit HTML.

how-to-use-sumo-tools-in-blogger-blog-101helper

Step 5: Click inside your theme code and search for <head>.

how-to-add-sumo-code-in-blogger-blog

Step 6: Paste the copied code and click on save theme button.

Note: Activate your sumo account by clicking on activation link in your email.

Step 7: Go back to sumo tools by visiting sumo.com.

Step 8: Click on Manage.


Step 9: Now select desired tools in the menu and customize them, you can use share tools, list builders heatmaps, image share buttons etc.

Its done, now you have setup sumo account and you can make popups, page take over, share buttons by logging in and making these gadgets. These tools will start showing up on your site.

I hope you found this post helpful, if not tell me by leaving a comment below. Thanks for visiting 101Helper. If you need any help contact me or leave comments below.

Search keywords: sumo tools for blogspot blog,legendary email collecting tool for blogger,popup gadgets for blogger,increase page views,mail list,followers,likes using sumo tools,how to increase blog traffic using sumo tools in blogger.

Thứ Sáu, 28 tháng 7, 2017

How To Install Emoji Reactions(Smileys) In Blogger


We all are familiar with emoji reactions because all of us use social networks and chatting and texting is incomplete without emoji reactions(smileys). These emoji reactions help us to explain our feelings about things and so I decided to create a post about it. So far I have seen in many blogs that they have emoji reactions in comment form and a emoji code is to be placed where emoji is to be shown but that's too old and most people don't like it. So I decided to tell you about these new type of emoji reactions that are placed in the bottom of post and show reaction of people to that post.

Maybe you are thinking why should I add emoji reactions in my blog, it is useless but let me tell you that blogging is not just about growing blog more and more and earn money, but you must have something more which will make your blog special and these emoji reactions will grab attention of many visitors and will also tell them about how many people liked your post. Here is a picture of emoji reactions which can be added in your blog posts.


Look how cute these are ! , I have taken a screenshot of these smileys and you can see that there are certain numbers tell us expression of people. So its a good thing for your blog, ain't it ? if not tell me in comments !

Features Of Emoji Reactions Buttons:

1. Ofcourse these buttons are absolutely free.

2. You can add them in website or blog.

3. Compatible with mobile and desktop site.

emoji-reaction-example-blogger

4. Reaction clicks are counted by IP.

5. Analytics available.

How To Install Emoji Reactions Buttons In Blogger ?

Follow below steps:

Step 1: Go to Sharethis Reaction Buttons.

Step 2: Click on  GET REACTION BUTTONS  button.

Step 3: Align your buttons to left, right or center.


align-emoji-buttons-blogger

Step 4: Click on  REGISTER & GET THE CODE  button.

Step 5: Enter your domain/blog URL, Email and password, check the terms and use box and click on   GET THE CODE .

how-to-get-sharethis-reaction-buttons-emoji-smileys-in-blogger

Step 6: Copy the first code and go to blogger dashboard > Theme and click on Edit HTML.

sharethis-emoji-reactions-code-blogger

Step 7: Paste the first code after  <head>  in your theme code and save theme.

Note: In case if blogger is not saving theme when you paste the first code after  <head>  then replace "&" from your script with  &amp;  as shown below

<script type="text/javascript" src="//platform-api.sharethis.com/js/sharethis.js#property=597b0fd3ea2b3c001261916f &amp; product=inline-reaction-buttons"></script>


Step 8: Copy second code as shown in the image above and paste it where you want to show reaction buttons.

To Show Reaction Buttons Below Posts:

If you want to show reaction buttons below your posts then copy below code and paste it above  <div class='post-footer'>  in your theme code.
<b:if cond='data:blog.pageType == "item"'>
<div class="sharethis-inline-reaction-buttons"></div>
</b:if>

Note: You will find  <div class='post-footer'>  two times in your theme paste the above code above second  <div class='post-footer'> .

Step 9: Save your theme.

Step 11: Click on Labs(beta) in the menu on left side and choose Inline Reaction buttons.


Step 12: Turn on your reaction buttons and wait for 5 minutes to let your reaction buttons get activated and start appearing below your posts.

how-to-activate-sharethis-emoji-buttons-blogger

Congratulations, you are done! wait for 5 minutes to see reaction buttons!


If Reactions Button Are Not Appearing: 

Sometimes reaction buttons still don't appear even after 5 minutes of activation, in that case go to your Sharthis account, Login to it and click on Property Settings and verify your email by clicking on the send verification button and go to your email and click on the verification button sent from Sharethis.

sharethis

I hope you found this post helpful and enjoyed reading it, read more from below. If you have any question ask me in comments or you can contact us.

Thanks for visiting +101helper .

Search keywords: smileys for blogger,add emojis to blogger posts,facebook smileys in blogger,smiley reaction buttons below blog posts,emoticons blogger script,blogger emoji

Thứ Ba, 4 tháng 7, 2017

How To Add Refreshable Random Post Widget In Blogger


I am again posting about random post widget and this is because I have made a special random post widget that can be refreshed by simply clicking on a button, I am also using this widget and so I decided to share it with you. You might be thinking why I am sharing this widget because you already have this widget but this is not an ordinary random post widget. It is a special widget and your visitors can refresh content and hence you have more reach to your older posts.

This widget is more good for big blogs which have 100 posts and visitors visit only a few pages. If you have same problem then this widget will help you, how ? the answer is obvious ! For example a visitor visits your blog from Google and read your post and see your ordinary random post widget and all the post he see doesn't grab his interest then he just leave your blog but if there is a refresh button he will just click on it and get some fresh content that will grab his interest and hence every visitor will give you atleast 5 views. I have tried this widget and it really multiply page views.

Another special thing about this widget is if your visitor doesn't refresh content it will be refreshed automatically after given time so your visitor gets fresh content any way and you get your traffic multiplied.

Features:

1. Refreshable content is available to visitors.

2. Automatically refreshable as well as can be refreshed by refresh button.

3. More exposure to visitors (old posts get reach ).

4. Increase your page views upto 5 pageviews / person.

What you need to install this widget ?

1. A Blogger blog

2. A free hosting like 000webhost or any other webhost to store your code on.

3. 5 minutes to follow below steps
Steps to Install Refreshable random post widget:

To add refreshable random post widget in your blog your need to follow below steps.

Step 1: Go to 000webhost and signup for a free account, enter your email, password and hosting website name(e.g myrandompost).

000webhost-free-webhosting

Step 2: Go to your email and click on the verification link to verify your account in the email from 000webhost.

verify-000webhost-account

Step 3: After confirming your account click on "MANAGE WEBSITE".

how-to-verify-000webhost-account

Step 4: Click on "UPLOAD OWN WEBSITE".

how-to-upload-files-in-000webhost

Step 5: Click on the icon as shown in the below image to create a file.

how-to-add-random-post-widget-in-blogger

Step 6: Name it "index.html" and click on create.

blogger-refreshable-random-post-widget

You are almost done keep going !


Step 7: Copy below code:
<head>
<meta http-equiv="refresh" content="40">
</head>
<div id="important">
<style>
#important h3 { font-family: trebuchet ms; position: relative; top: 5px; }
#random-posts li {list-style: none;padding: 3px 0px;border-bottom: 1px solid #ddd;}
#random-posts a {color:#3993e2;text-decoration:none;}
#random-posts a:hover {text-decoration:none}
#random-posts li:last-child {border:0}
#random-posts li { margin-bottom: 5px; list-style-type: none; width: 100%; float: left; }#random-posts img { float: left; margin-right: 5px; border: 2px solid #D9D9D9}
#random-posts {padding: 0;width: 24%;height:435px;padding: 0 0 0 5px;width:100%;list-style-type: none;padding: 0px;}
#random-posts a {font-size: 14.3px;font-family:trebuchet ms;}
#fresh { width: 100%; text-align: center; position: relative; top: 10px; }
#fresh a {font-family: trebuchet ms; font-size: 14px; font-weight: bold;color: #fff; background: #64ca64; padding: 8px 30px; width: 100%; text-decoration: none; border-radius: 100px; }
</style>
<h3>You may like reading:</h3>
<ul id="random-posts">
<script>
var randomposts_number = 5;
var randomposts_chars = 0;
var randomposts_details = 'no';
var randomposts_thumbnails = 'no'
var randomposts_comments = 'Comments';
var randomposts_commentsd = 'Comments Disabled';
var randomposts_current = [];
var total_randomposts = 100;
var randomposts_current = new Array(randomposts_number);

function randomposts(json) {
total_randomposts = json.feed.openSearch$totalResults.$t
}
document.write('<script type=\"text/javascript\" src=\"https://101helper.blogspot.com/feeds/posts/default?alt=json-in-script&max-results=0&callback=randomposts\"><\/script>');

function getvalue() {
for (var i = 0; i < randomposts_number; i++) {
var found = false;
var rndValue = get_random();
for (var j = 0; j < randomposts_current.length; j++) {
if (randomposts_current[j] == rndValue) {
found = true;
break
}
};
if (found) {
i--
} else {
randomposts_current[i] = rndValue
}
}
};

function get_random() {
var ranNum = 1 + Math.round(Math.random() * (total_randomposts - 1));
return ranNum
};
</script>
<script>
function random_posts(json) {
for (var i = 0; i < randomposts_number; i++) {
var entry = json.feed.entry[i];
var randompoststitle = entry.title.$t;
if ('content' in entry) {
var randompostsnippet = entry.content.$t
} else {
if ('summary' in entry) {
var randompostsnippet = entry.summary.$t
} else {
var randompostsnippet = "";
}
};
randompostsnippet = randompostsnippet.replace(/<[^>]*>/g, "");
if (randompostsnippet.length < randomposts_chars) {
var randomposts_snippet = randompostsnippet
} else {
randompostsnippet = randompostsnippet.substring(0, randomposts_chars);
var whitespace = randompostsnippet.lastIndexOf(" ");
randomposts_snippet = randompostsnippet.substring(0, whitespace) + "&#133;";
};
for (var j = 0; j < entry.link.length; j++) {
if ('thr$total' in entry) {
var randomposts_commentsnum = entry.thr$total.$t + ' ' + randomposts_comments
} else {
randomposts_commentsnum = randomposts_commentsd
}; if (entry.link[j].rel == 'alternate') {
var randompostsurl = entry.link[j].href;
var randomposts_date = entry.published.$t;
if ('media$thumbnail' in entry) {
var randompoststhumb = entry.media$thumbnail.url
} else {
randompoststhumb = "https://blogger.googleusercontent.com/img/b/R29vZ2xl/AVvXsEhORKPufNb6JH9rHPPg2mJWJM2PgEspeyHXEmJWJlCenlQURF-sB3EWGug7zwfPZzYkH5kGMmMB-yOK-QPls-hQyKvbyWip6ZyIxxOei8EfexzFi58SUlLFBMBf51BZnK9QCsIGwXVgQuI/s1600/no_thumb.png"
}
}
};
document.write('<li>');
document.write('<a href="' + randompostsurl + '" rel="dofollow" target="_parent"><img alt="' + randompoststitle + '" src="' + randompoststhumb + '"/></a>');
document.write('<div><a href="' + randompostsurl + '" rel="dofollow" target="_parent">' + randompoststitle + '</a></div>');
}
};
getvalue();
for (var i = 0; i < randomposts_number; i++) {
document.write('<script type=\"text/javascript\" src=\"https://101helper.blogspot.com/feeds/posts/default?alt=json-in-script&start-index=' + randomposts_current[i] + '&max-results=1&callback=random_posts\"><\/script>')
};
</script>
</ul>
</div>
<div id="fresh"><a href="/">Refresh Content !</a></div>


Step 8: Right click on your index file you just created and edit it.

how-to-install-refreshable-random-post-widget-in-blogger

Step 9: Paste the copied code which you copied in step 7 and click on "SAVE & CLOSE"

Make following changes before saving:

1. Replace https://101helper.blogspot.com with your blog URL.

2. Change 40 if you want the widget to refresh automatically after desired time.

3. Change 5 to change number of posts.

how-to-host-files-on-000webhost

Step 10: Now again right click on your file and click on "VIEW".

Congratulations ! now your refreshable widget in ready to be installed in your blog.

Step 11: Copy your file URL from the browser and replace it with YOUR LINK HERE in below code and copy the final code.
<iframe width="90%" id="reloader" src="YOUR LINK HERE"></iframe>
<style>#reloader {width:100%;border: 0;height: 550px;}</style>

Note: Do not include https: in your URL, you URL should be without https: otherwise browser will not let it load e.g: //widget.000webhostapp.com/index.html 

Final code appearance:
<iframe width="90%" id="reloader" src="//widget.000webhostapp.com/index.html"></iframe>
<style>#reloader {width:100%;border: 0;height: 550px;}</style>

Step 12: Go to blogger > layout and click on add a gadget in the sidebar. choose HTML/Javascript.

how-to-add-gadget-in-blogger

Step 13: Paste the copied code and click on save.

Open your blog to see refreshable random post widget.

I hope you liked this widget, share your opinion in comments.

Share this post with others because ❤ Sharing is caring !

Search keywords: Refreshable Random Post Widget for Blogger, Random post widget for blogger, iframe random post widget, blogger gadgets, 101helper blogging tutorials.