This article shows how you can embed tracks or albums from Spotify in your blog or website, even if you don't use Spotify yourself.
 If you have a blog / website about music, then you probably want to share clips with your readers.
Many music and video hosting sites let you do this by embedding them: this means that you allow YouTube (or SoundCloud or Vimeo, etc) to use some space on your site to show a particular piece of their content, with their logo / brand attached to it. They do this because it gives them exposure - and you get to keep the visit on your site instead of sending them away.
There are some music-recordings which are on Spotify, but aren't on any of the other music systems. Today, when I google "how to embed from Spotify, I get instructions which say "just right-click on the item in Spotify, and choose embed" (sometimes using slightly different words) - like this:
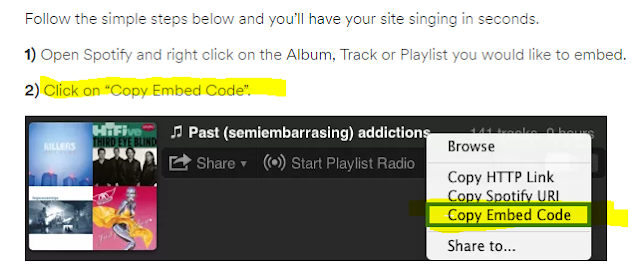
However when I right-click on a track in Spotify, the "Copy Embed Code" option is missing.

I'm not sure if this is because I don't have a Premium subscription, because of some issue with my browser, or just because Spotify changed their system but didn't update their documents.
Fortunately I've found that there is a Spotify tool you can use to generate the embed code.
1 Find the item (song, track, album or artist) that you want to embed
2 Right click on it, and choose Copy <<Whatever>> :Link (eg Copy Song Link or Copy Playlist Link)

3 Go to this webpage (opens it in a new tab or window when you click it): https://developer.spotify.com/technologies/widgets/spotify-play-button/
4 Scroll down to Get the Code, and paste the copied value into the box

5 Copy the code which is put into the box under step 3.
6 For Blogger, install it into your blog the same way you would install any other HTML code. For other tools, eg Wordpress.org, follow the usual approach for embedding code
What exactly it looks like depends on the type of item, and perhaps where you put it.
What this embedded item does (eg does it play a readder clicks on it) depends on

If they don't have this permission, you may see a response like the one to the right.
About putting tracks from Spotify onto your website

Many music and video hosting sites let you do this by embedding them: this means that you allow YouTube (or SoundCloud or Vimeo, etc) to use some space on your site to show a particular piece of their content, with their logo / brand attached to it. They do this because it gives them exposure - and you get to keep the visit on your site instead of sending them away.
There are some music-recordings which are on Spotify, but aren't on any of the other music systems. Today, when I google "how to embed from Spotify, I get instructions which say "just right-click on the item in Spotify, and choose embed" (sometimes using slightly different words) - like this:
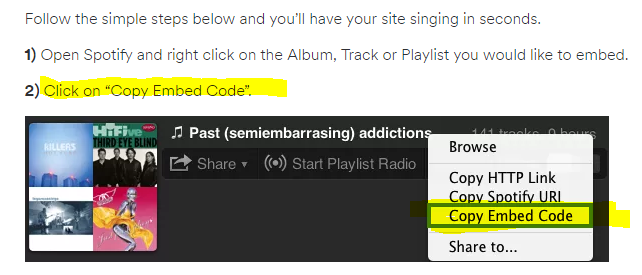
However when I right-click on a track in Spotify, the "Copy Embed Code" option is missing.

I'm not sure if this is because I don't have a Premium subscription, because of some issue with my browser, or just because Spotify changed their system but didn't update their documents.
Fortunately I've found that there is a Spotify tool you can use to generate the embed code.
How to show a song, album, artist or playlist from Spotify in your blog / website
1 Find the item (song, track, album or artist) that you want to embed
2 Right click on it, and choose Copy <<Whatever>> :Link (eg Copy Song Link or Copy Playlist Link)

3 Go to this webpage (opens it in a new tab or window when you click it): https://developer.spotify.com/technologies/widgets/spotify-play-button/
4 Scroll down to Get the Code, and paste the copied value into the box

5 Copy the code which is put into the box under step 3.
6 For Blogger, install it into your blog the same way you would install any other HTML code. For other tools, eg Wordpress.org, follow the usual approach for embedding code
Job done!
You will now have an item from Spotify displaying in your blog.What exactly it looks like depends on the type of item, and perhaps where you put it.
What this embedded item does (eg does it play a readder clicks on it) depends on
- Your visitor's status: Spotify members see the whole thing, free-service members only see a 30-second clip, and
- Where they are viewing it from ie does the country they are accessing the internet from have rights to see the material you shared

Troubleshooting
If you try to embed somehthing, then visitors to your website who are accessing the internet from another country if the "content owner" (ie person who made the album, track, etc that you're embedding) has given permission for this.If they don't have this permission, you may see a response like the one to the right.